Menu

Managing the Late August Temperature Swing in the Pacific Northwest
Late August is here, which means preparing your heat pump for the shift from cooling to heating should be at the top of your back-to-school transition checklist. At Best Owner Direct HVAC & Electrical, we know that if you live in the Cornelius, OR area, you already know the unique weather pattern that arrives at the end of summer. The afternoons still bring intense heat that demands heavy air conditioning, but once the sun goes down, nighttime temperatures can plummet rapidly into the fifties. This massive diurnal temperature swing forces your home comfort system to work double duty, often cycling between cooling and heating modes within a single twenty-four-hour period.
If you want to ensure your equipment survives this daily tug-of-war, understanding how your heat pump systems operate is the first step toward securing reliable heating preparation and services for the upcoming fall. The stress of switching back and forth places a heavy burden on both the mechanical moving parts and the electrical components inside your unit. In our experience, most homeowners do not realize that this late-summer transition period is actually one of the most demanding times of the year for their equipment.
The decision point for homeowners: You need to know which preventative steps are safe to handle yourself and which tasks require a licensed professional. Taking action now prevents unexpected breakdowns during the first true cold snap. By addressing basic maintenance and scheduling professional oversight before the heavy fall heating season begins, you protect your investment and keep your monthly energy usage in check.
Why the Late-Summer Shift is Uniquely Demanding
During the peak of summer, your system runs almost exclusively in one direction. It pulls warm air from inside your house, absorbs the heat, and releases it outdoors. The internal components find a steady rhythm. However, during the back-to-school transition in late August, the sudden need for nighttime warmth forces the system to abruptly reverse this entire process. This start-and-stop, reversing action requires extra energy and places sudden mechanical stress on valves and motors that have been operating in a single mode for months.
Understanding the Mechanics: How Your System Adapts
To grasp why this seasonal shift matters, you have to look inside the equipment. A heat pump does not burn fuel to create warmth like a traditional gas furnace. Instead, it moves heat from one place to another using refrigerant. The magic behind this two-way street is a specific component called the reversing valve.
The reversing valve is a specialized mechanical piece that physically shifts the flow of pressurized refrigerant. When your thermostat calls for cooling, the valve directs the refrigerant to absorb indoor heat and dump it outside. When the temperature drops and your house needs warmth, a solenoid on the valve shifts a sliding mechanism. This reverses the flow, allowing the system to absorb ambient heat from the outdoor Pacific Northwest air and compress it to warm your home.
The Toll of Frequent Mode Toggling
Frequent toggling between modes during the late-summer transition can wear on the reversing valve. If the days are hot and the nights are cold, that valve might slide back and forth twice a day. Over time, the internal slider can become sticky, or the electrical solenoid that controls it can weaken. When this happens, you will start noticing signs that the system is struggling to make the shift.
• Cooling (Afternoon) — Normal Operation: Crisp, cold air flows steadily from vents within minutes. — Warning Signs of a Failing Valve: Air feels lukewarm; system runs constantly without lowering humidity.
• Heating (Nighttime) — Normal Operation: Warm air gently raises indoor temperature to match thermostat. — Warning Signs of a Failing Valve: System blows cold air at night; strange hissing noises from outdoor unit.
• Transitioning — Normal Operation: Quiet, seamless shift between modes with a brief pause. — Warning Signs of a Failing Valve: Loud clicking, delayed starts, or getting permanently stuck in one mode.
While the equipment is engineered specifically for this kind of dual-mode operation, proper maintenance ensures it operates efficiently. Ignoring the mechanical reality of the reversing valve often leads to a system that gets stuck in cooling mode just as the cold weather truly sets in.
Safe Homeowner Prep: Clearing the Summer Debris
As the seasons change, there are several highly effective steps you can take to improve airflow and efficiency without opening any electrical panels. Delivering the right amount of air to the system is the single most effective way to ease the late-summer transition.
Our technicians at Best Owner Direct HVAC & Electrical see the impact of poor airflow constantly during late-summer service calls. One local Cornelius customer recently experienced an inducer motor failure within a month of a previous service call. Our team replaced the faulty motor free of charge to resolve the issue completely, but this situation highlights a broader pattern we see often: mechanical failures frequently trace back to simple airflow restrictions. When a system cannot breathe, motors overheat and fail prematurely.
Here is a safe, actionable checklist for homeowners to prepare their equipment for the remaining cooling days and the upcoming heating nights, maximizing late summer cooling efficiency while prepping for fall:
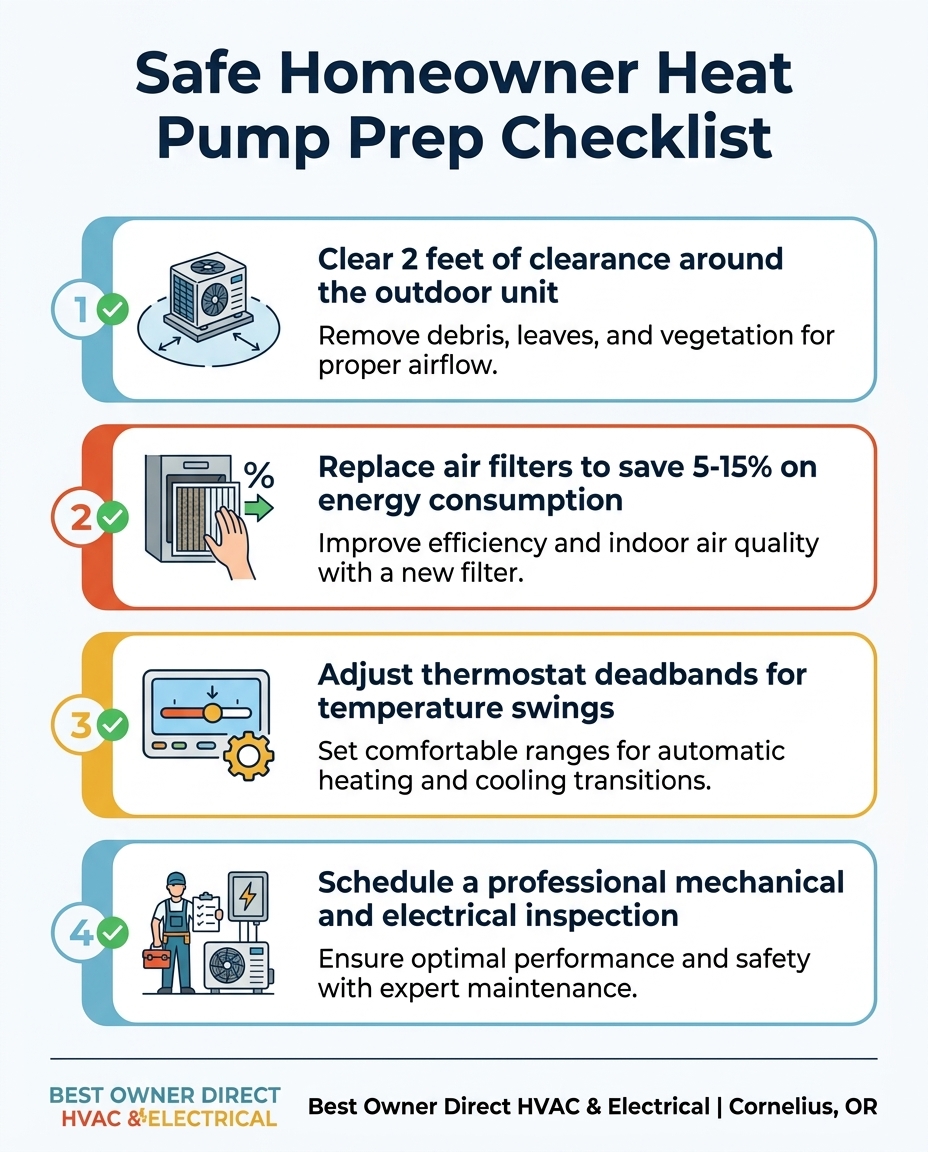
• Inspect the outdoor condenser unit: Walk around your outdoor equipment and look for overgrown late-summer vegetation, accumulated pollen, and yard debris. The late August back-to-school transition is the perfect time to clear away leaves and twigs that have built up over the summer.
• Establish a two-foot perimeter: Provide a safe, clear perimeter of at least two feet around all sides of the outdoor unit. Trim back bushes, tall grass, and low-hanging branches. The system needs to pull in massive amounts of outdoor air to heat your home efficiently at night.
• Check and replace the indoor air filter: Pull out your indoor air filter and hold it up to a light. If you cannot see light shining through, it is time for a replacement. Replacing a dirty, clogged filter reduces energy consumption by 5 to 15 percent and prevents the blower motor from overworking.
• Clear your indoor supply and return vents: Walk through every room and ensure that rugs, furniture, and curtains are not blocking the floor or wall vents. Closing vents in unused rooms actually increases pressure inside the ductwork, forcing the system to work harder.
Thermostat Strategies for Diurnal Temperature Swings
Your thermostat acts as the brain of your home comfort system. During days with massive temperature swings, how you program that brain dictates how hard your equipment works. If you set your thermostat to auto-switch too aggressively between heating and cooling, you run the risk of "short-cycling."
Short-cycling happens when the system turns on, runs for a very brief period, shuts off, and then immediately turns back on. This draws excessive electricity and causes severe wear on the compressor. To manage the Pacific Northwest climate shifts effectively, you need to adjust your settings.
Steps for Optimizing Your Thermostat
1. Set a wider deadband: The deadband is the temperature gap between your cooling trigger and your heating trigger. If your cooling is set to 72 degrees and your heating is set to 70 degrees, the system will constantly fight itself as the sun goes behind a cloud. Widen this gap to at least 4 to 5 degrees (for example, cool at 74 degrees, heat at 68 degrees).
2. Utilize programmable schedules: The back-to-school transition period usually means the house is empty during the hottest part of the day. Program your thermostat to allow the house to get slightly warmer while you are away, reducing the cooling load.
3. Establish a baseline for nighttime: Decide on a comfortable, lower baseline for nighttime heating. Heat pumps are most efficient when they maintain a steady temperature rather than trying to recover from deep temperature setbacks. Find a comfortable nighttime setting and leave it there.
4. Monitor smart thermostat behavior: If you have a smart thermostat, check its auto-schedule feature. Sometimes, the artificial intelligence tries to predict your behavior based on mid-summer habits, which can cause the system to overcool the house just as the chilly evening air arrives.
By giving the system a wider buffer, you prevent the reversing valve from toggling back and forth unnecessarily, saving wear and tear on the entire unit.
The Electrical Demands of Winter Heating
While the mechanical shifting of refrigerant is fascinating, the electrical side of the equation is equally demanding. This is particularly true if your system relies on auxiliary heat strips.
During extreme cold snaps, a heat pump may trigger electric resistance coils—often called auxiliary or emergency heat—to supplement the warmth. These heat strips draw a massive amount of amperage. Over a long, hot summer, the electrical components that control these high-draw functions—like relays, capacitors, and contactors—can degrade from heat exposure and constant use.
The Value of Dual Expertise
A standard tune-up might only look at the mechanical refrigerant cycle. Our comprehensive inspections evaluate the mechanical moving parts alongside the high-voltage electrical circuitry, ensuring your breaker panel and wiring can safely handle the sudden spike in winter heating demands.
One Cornelius OR homeowner has relied on our team for years through various heating and cooling problems. Their continued trust stems from knowing that we evaluate the whole picture. In our years of troubleshooting local systems, we've found that when a unit struggles, the root cause could be a mechanical valve, or it could be a failing electrical relay. Having professionals who understand both sides of the system prevents misdiagnoses and ensures lasting safety.
High-voltage components inside the outdoor condenser hold lethal amounts of electricity, even when the breaker is turned off. Leave the multimeter testing to licensed professionals.
Knowing When to Call a Licensed Professional
Clearing yard debris and changing filters are excellent homeowner tasks, but there is a firm boundary where safe DIY ends and professional intervention begins. As you monitor your system during the late August back-to-school transition, watch for specific warning signs that indicate the system needs a licensed technician.
If you notice any of the following symptoms, it is time to schedule professional HVAC services:
• Strange odors: A burning electrical smell when the heat turns on can indicate failing wiring or dust burning off the auxiliary heat strips. Musty smells often point to biological growth on the indoor coil.
• Electrical buzzing: A loud buzzing or humming sound from the outdoor unit usually means an electrical contactor is failing to engage or a capacitor is dying.
• Stuck in one mode: If the thermostat calls for heat, but cold air blows indefinitely, the reversing valve is likely stuck or the solenoid has failed.
• Ice buildup: While a light frost is normal in deep winter, thick ice encasing the outdoor unit in late summer or early fall indicates a severe refrigerant issue or a failing defrost control board.
What a Professional Fall Tune-Up Entails
Checking refrigerant levels and testing the reversing valve are strictly tasks for licensed technicians. During a proper fall maintenance visit with Best Owner Direct HVAC & Electrical, our technicians connect specialized gauges to verify the exact pressure of the refrigerant. We test the defrost controls to ensure the unit can melt away winter ice, and we calibrate the temperature sensors so the system reads the outdoor climate accurately.
Schedule this professional help before the first true winter freeze causes a massive backlog of service calls. Getting ahead of the weather ensures your home remains comfortable without interruption.
Securing Reliability for the Coming Months
In our experience maintaining systems across Cornelius, proactive, ongoing maintenance is the secret to a system that lasts for fifteen years instead of eight. Routine checks prevent mid-winter breakdowns by catching small issues—like a weakened capacitor or a slightly sticky reversing valve—before they escalate into total system failures.
There is a distinct peace of mind that comes with knowing your equipment is optimized for both efficiency and safety. Regular maintenance also keeps your manufacturer warranties valid. Most major equipment brands explicitly state that failure to perform annual professional maintenance can void the warranty on expensive parts like the compressor.
Automating Your Comfort
To make this transition effortless year after year, consider enrolling in a structured preventative maintenance plan. These plans automate the seasonal transitions, ensuring a licensed professional evaluates the mechanical and electrical health of your system every spring and fall. You will not have to guess if the system is ready for the Cornelius OR winter; you will know it is.
Frequently Asked Questions
At what temperature should I switch my heat pump from cool to heat?
There is no single magic number, but most homeowners make the transition when daytime highs consistently stay below 65 degrees Fahrenheit. In regions with large daily temperature swings, setting a wide deadband on your thermostat allows the system to switch automatically without manual intervention. This prevents you from having to constantly monitor the thermostat.
How do I test my heat pump before winter?
Pick a cool morning to turn your thermostat to heating mode and raise the temperature setting a few degrees above the current room temperature. Listen for the outdoor unit to turn on and place your hand over an indoor vent to feel for warm air within five to ten minutes. If the air remains cold or the unit makes unusual grinding noises, turn it off and call a professional.
Why does my heat pump smell when I turn on the heat for the first time?
A brief burning dust smell is very common when the heating elements engage for the first time after a long summer. Dust settles on the auxiliary heat strips inside the ductwork, and it safely burns off within a few minutes. However, if the smell smells like melting plastic or burning wires, shut the system down immediately at the breaker.
How do I prepare my heat pump for winter in the Pacific Northwest?
Start by clearing all late-summer vegetation and debris away from the outdoor unit to ensure maximum airflow. Next, replace your indoor air filter so the blower motor does not have to struggle against restricted air. Finally, schedule a professional electrical and mechanical inspection to verify the reversing valve and defrost controls are functioning correctly.
Can a dirty filter cause my heat pump to struggle during temperature swings?
Yes, a clogged filter severely restricts airflow, which is the leading cause of system strain and motor failure. When the system transitions between cooling and heating, it needs optimal airflow to transfer heat efficiently. Changing the filter is the easiest way to lower energy consumption and protect the equipment.
Ensure Your System is Ready for the Fall Chill
Preparing your heat pump for the shift from cooling to heating is about taking safe, proactive steps today to secure your indoor comfort tomorrow.


How to Prevent Rain Damage to Your Outdoor Mini Split Unit Fast by Using a CoverLearn how moisture and rain affect your outdoor mini split unit and protect it from damage with proper covers, drainage, and seasonal maintenance tips.
Read more
Sealing Leaky Ductwork Before the Winter Cold Sets InYour furnace is only as effective as the ducts delivering its warmth. If you're tired of drafty rooms, securing your system's thermal envelope is the first step to true winter comfort.
Read more
All About How a Mini Split Adds Value to Your HomeLearn how a mini split adds value to your home with energy savings, zoned comfort, and increased property valuation.
Read more