Menu


Why Understanding How Line Sets Are Run Through Your Walls Can Save You Time, Money, and Headaches
How line sets are run through your walls is one of the most important — and most misunderstood — parts of any ductless mini-split installation. Get it right, and your system runs quietly and efficiently for years. Get it wrong, and you could be looking at moisture damage inside your wall cavity, refrigerant leaks behind drywall, or a compressor failure caused by a single kink in the copper tubing.
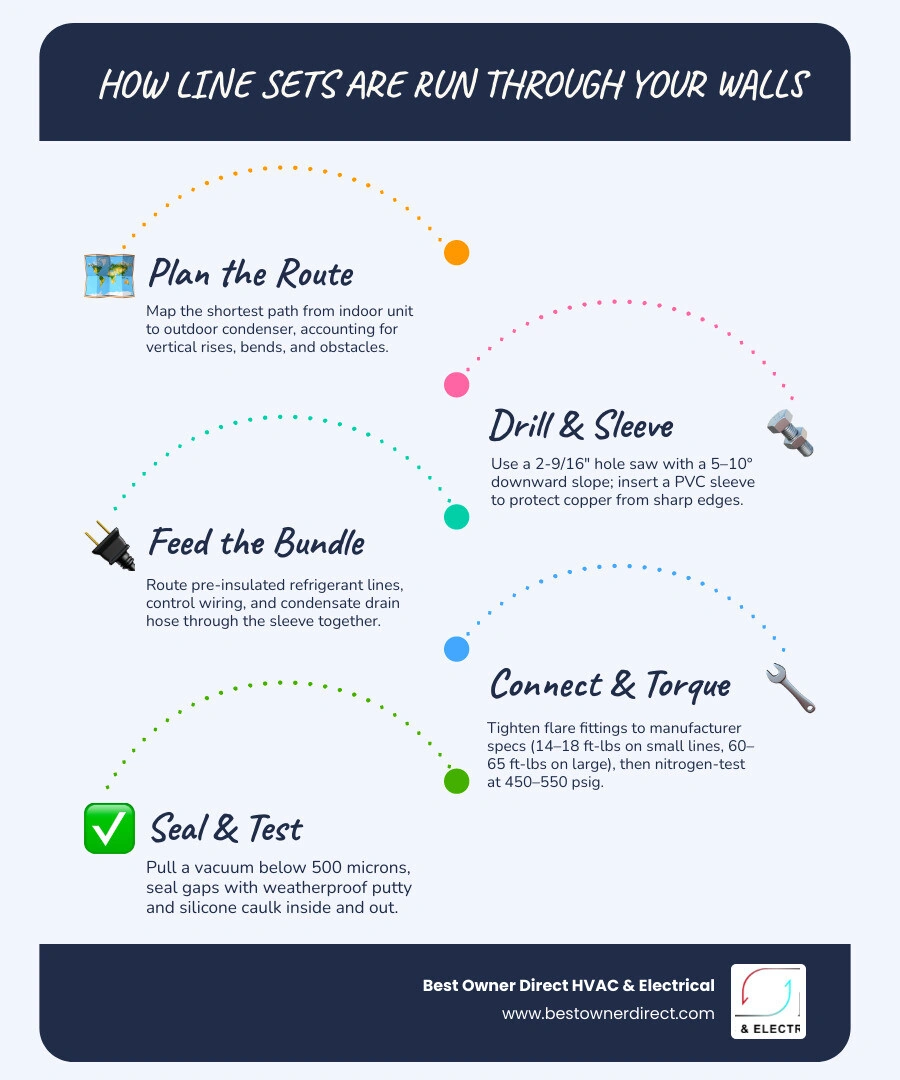
Here is a quick overview of how line sets are routed through walls:
- Plan your route - Map the shortest path from your indoor air handler to the outdoor condenser, accounting for vertical rises, bends, and obstacles.
- Drill the wall penetration - Use a 2-9/16 inch (65mm) hole saw and angle the hole 5 to 10 degrees downward toward the exterior for condensate drainage.
- Insert a wall sleeve - Slide a protective PVC sleeve into the hole to protect the copper tubing from sharp edges.
- Feed the line set through - Route the pre-insulated refrigerant lines, control wiring, and condensate drain hose through the sleeve as a bundle.
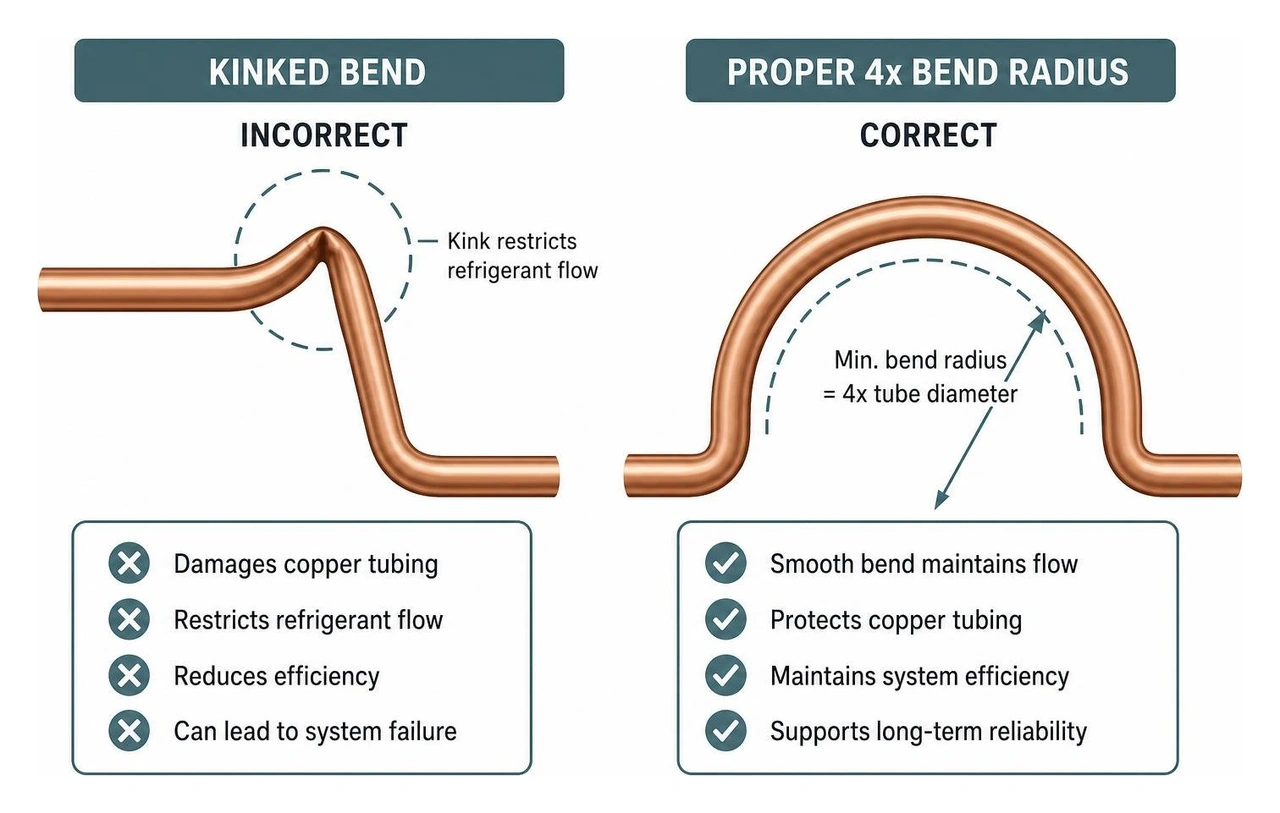
- Maintain minimum bend radius - Keep all curves at least 4 times the tube diameter to prevent kinking.
- Connect and torque the flare fittings - Tighten to manufacturer torque specifications using two wrenches.
- Pressure test and vacuum the system - Nitrogen-test at 450 to 550 psig, then pull a vacuum below 500 microns before releasing refrigerant.
- Seal the wall penetration - Fill gaps with weatherproof putty and exterior-grade silicone caulk on both sides of the wall.
Most homeowners in the Portland metro area face a real decision at this stage: do you hide the lines inside the wall for a clean look, or run them along the exterior in a protective cover? Both approaches work — but each comes with trade-offs around aesthetics, access, and long-term serviceability that are worth understanding before you pick up a drill.
For a deeper look at how ductless systems work overall, the Ductless Mini Split Systems Explained guide is a great starting point.
In-Wall vs. Exterior: Weighing Your Mini-Split Routing Options
When we install a Mini Split AC system in the Portland area, one of the first conversations we have with homeowners centers on routing. Do we bury the lines inside the wall cavities, or do we run them along the exterior siding using a protective cover?
Each method has distinct advantages and long-term implications for your home's structure and future serviceability. Below is a direct comparison to help you understand the trade-offs:
| Feature / Consideration | In-Wall Concealment | Exterior Surface-Mounted (SlimDuct/Line Hide) |
|---|---|---|
| Aesthetics | Completely invisible; pristine interior and exterior walls. | Visible on the exterior; looks like a neat, paintable downspout. |
| Installation Complexity | High; requires opening drywall, drilling plates, and precise routing. | Low to Moderate; direct penetration out of the back of the indoor unit. |
| Future Serviceability | Difficult; repairing leaks or replacing lines requires opening drywall. | Extremely easy; snap-off covers provide instant access to lines and wires. |
| Drywall Repair Needed | Yes; matching texture and paint inside the home is required. | No; the line set exits directly behind the indoor unit to the exterior. |
| Future-Proofing | Low; changing wire gauges or line set sizes later is highly invasive. | High; covers can easily accommodate new lines or updated control wires. |
Aesthetic Benefits of Hiding Line Sets Inside Walls
For many homeowners, the visual appeal of a completely hidden installation is the ultimate goal. Nothing preserves the clean lines of a modern interior or the historic charm of a classic craftsman home in Beaverton or Hillsboro quite like keeping the mechanical components out of sight.
When we route the line sets inside the wall, we eliminate the need for exterior plastic line hides. This is particularly valuable for historic homes or neighborhoods with strict HOA guidelines where exterior modifications are tightly regulated. By tucking the copper lines, control wires, and drain lines inside the stud bays, the indoor head unit appears to float on the wall with no visible connections.
If you are looking to preserve your home’s character while upgrading your HVAC system, our guide on Ductless Heating and Cooling for Homes Without Ductwork details how these systems integrate seamlessly into older architectural styles.
Maintenance and Access Challenges of In-Wall Routing
While in-wall concealment is the gold standard for aesthetics, it introduces real practical challenges. The most significant concern is future serviceability. Copper refrigerant lines are incredibly durable, but they are not entirely immune to physical damage from structural shifting, accidental punctures from drywall screws, or rare manufacturing defects. If a leak develops inside an inaccessible wall cavity, finding and repairing it requires cutting into your finished drywall.
Furthermore, future system upgrades can become complicated. As technology evolves, manufacturer specifications change. For instance, some older mini-split systems utilized 18 AWG control wiring, while many modern systems require robust 14 AWG shielded wire. If your control wire is buried directly in the wall without a conduit, upgrading your system in the future will mean tearing out drywall just to run a new cable.
To future-proof an in-wall installation, we highly recommend installing a high-quality, rigid conduit alongside the line set during the initial installation. This allows us to easily pull new control wires or sensor cables down the road without disturbing your home's finishes.
Step-by-Step: How Line Sets Are Run Through Your Walls Safely
Running a line set through a wall is a highly precise task. While some ambitious homeowners attempt this as a DIY project, improper execution can lead to structural issues, water leaks, and voided equipment warranties. Understanding How a Mini Split Installation Works Step by Step can help you appreciate the level of detail required for a successful setup.
Preparing and Drilling the Wall Penetration
The physical connection between your indoor air handler and the outdoor condenser begins with a single, crucial wall penetration.
First, we carefully map out the indoor unit’s mounting bracket. The hole must be drilled in a specific location — typically 6 to 12 inches below or directly behind the unit's knockout point, depending on the manufacturer's template.
For a standard residential single-zone system, we use a heavy-duty hole saw to cut a 2-9/16 inch (65mm) diameter hole through the wall. The most critical rule of drilling this hole is the pitch: it must be drilled at a 5-to-10-degree downward slope toward the exterior (at least 1/4 inch of drop per foot).
This downward angle is mandatory. Because mini-split indoor units rely on gravity to drain the condensation they pull from your indoor air, any upward slope or flat spot in the wall penetration will cause water to back up, leading to ruined drywall and mold.
Once the hole is drilled, we slide a plastic wall sleeve through the opening. This sleeve serves two vital purposes: it prevents the sharp edges of your wall's framing, sheathing, or siding from slicing into the soft copper tubing or control wires, and it provides a clean, smooth channel for the bundle to slide through.
If you are planning a project in the west metro area, our team specializes in precise Mini Split Installation Beaverton OR services to ensure your home's envelope remains secure and perfectly sloped.
Routing and Bending Guidelines for How Line Sets Are Run Through Your Walls
Copper refrigerant lines are soft and pliable, but they can easily kink if handled improperly. A kinked line restricts the flow of refrigerant, starves the compressor of oil, and can ruin a brand-new system within weeks.
To prevent this, we maintain a strict minimum bend radius of at least 4 times the tube diameter (and often up to 6 inches for larger lines). We use internal bending springs or mechanical tube benders to create smooth, sweeping curves rather than sharp, forced bends. Each sharp 90-degree bend we avoid preserves system efficiency; in fact, every tight bend adds the equivalent of about 2 feet of straight-pipe friction, which can silently degrade your system's overall capacity.
When routing through stud bays and around structural elements like sill beams, we must also protect the structural integrity of your home. Building codes dictate that you cannot drill a hole larger than 40% of a stud's width in a load-bearing wall without reinforcing the stud with approved shoe plates or framing brackets.
Additionally, if there is excess line set at the outdoor unit, we never coil it vertically. Vertical coils act as oil traps, preventing compressor oil from returning to the outdoor unit and causing compressor failure within 2 to 5 years. Instead, any excess line set must be coiled horizontally like a garden hose.
For residents in Tualatin and surrounding areas, our certified technicians handle these complex structural rules daily during Mini Split Installation Tualatin OR projects.
Connecting, Torquing, and Testing the Refrigerant Lines
Once the line set is routed, it must be connected to the indoor and outdoor units. Mini-split systems typically use flare fittings to make these connections. Unlike conventional split systems that are often brazed (soldered) together, flare connections rely on mechanical pressure to create a gas-tight seal.
Getting the tightness right is a matter of physics, not guesswork. Under-tightening leads to slow refrigerant leaks that can take months to diagnose, while over-tightening can crush the copper flare, causing it to split and leak immediately. We use a digital torque wrench and a backup wrench to tighten every connection to exact manufacturer specifications:
- 1/4-inch lines: 14 to 18 ft-lbs of torque
- 3/8-inch lines: 35 to 42 ft-lbs of torque
- 1/2-inch lines: 50 to 55 ft-lbs of torque
- 5/8-inch lines: 60 to 65 ft-lbs of torque
After the connections are torque-tested, we perform a rigorous leak test. We pressurize the entire system with dry nitrogen to 450 to 550 psig and hold it for at least 30 minutes to verify that the pressure remains absolutely stable.
Once the pressure test is successful, we connect a two-stage vacuum pump and a digital micron gauge to perform a triple-evacuation. We must pull a vacuum below 500 microns and hold it to confirm system integrity and the absolute absence of moisture or non-condensables. Only after these tests are passed do we open the service valves to release the refrigerant into the lines.
Preventing Moisture, Condensation, and Structural Damage Inside Walls
When refrigerant lines are hidden inside walls, they are completely out of sight — which means any condensation or structural rubbing will also be out of sight until major damage has occurred. Protecting your home’s structural integrity requires strict adherence to moisture management and physical protection standards.
When choosing a team for your home, ensuring they follow these strict protocols is key to a long-lasting installation. You can learn more about our standards on our HVAC Installation Replacement page.
Managing Condensate Drainage and Preventing Clogs
The condensate drain line is the most common source of water damage in poorly installed mini-splits. Because the indoor unit dehumidifies the air, it can produce gallons of water on a hot, humid summer day.
For gravity-fed drainage, the drain line must maintain a continuous downward slope of at least 1/4 inch of drop per foot (a 1-to-2% slope) with absolutely no sags, traps, or upward bends. Inside wall cavities, we never use the flexible, corrugated drain tubing that often comes in DIY kits. Over time, these flexible hoses can sag between studs, creating tiny traps where dust and algae collect. Instead, we run rigid, fire-rated PVC or CPVC piping for all concealed in-wall drain lines.
If routing constraints make a continuous gravity drain impossible, we install a high-quality condensate pump with a lift head rated for the vertical rise required. However, gravity is always the most reliable option.
That mini-split drain lines are prone to clogging every 2 to 4 years due to dust, lint, and algae buildup. Because of this, we always design accessible cleanout points near the indoor unit or where the line exits the wall, allowing you to flush the line with a simple vinegar solution or clear it with a wet/dry vac.
If you live in the south metro area, we provide specialized gravity and pump-assisted drainage configurations for Mini Split Installation Wilsonville OR projects.
Insulation and Sealing Best Practices for How Line Sets Are Run Through Your Walls
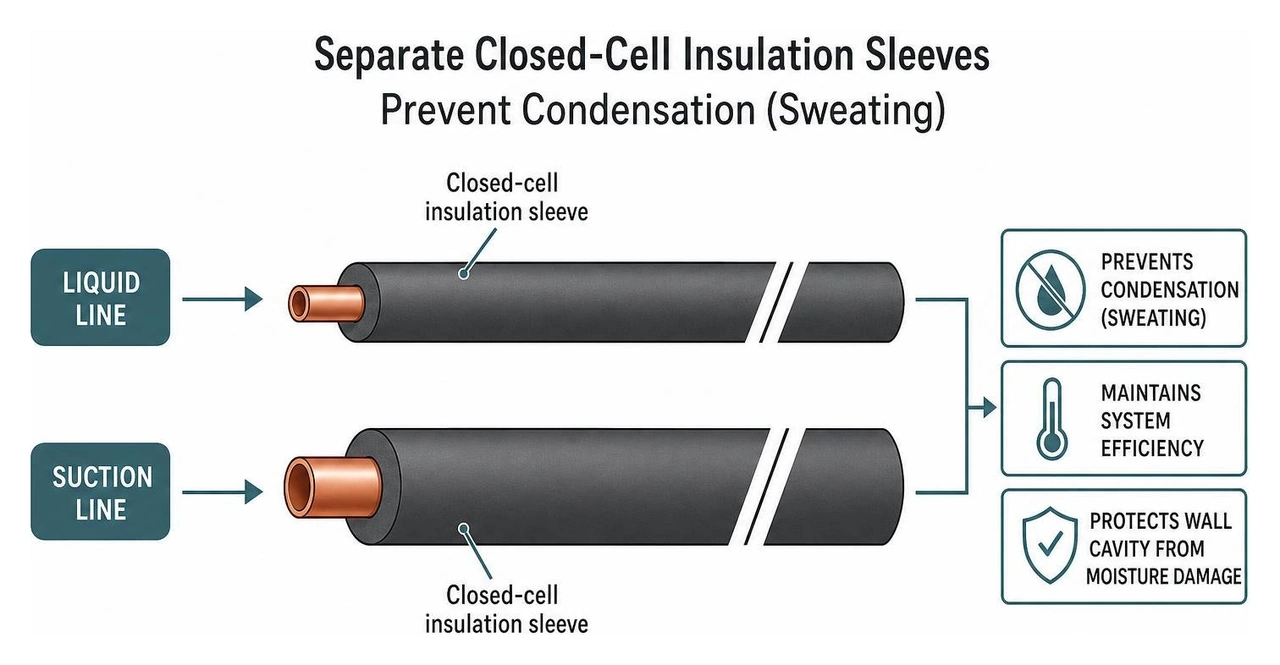
To prevent condensation (or "sweating") inside your dark wall cavities, both the liquid and suction lines must be insulated continuously.
We never stuff both refrigerant lines into a single insulation sleeve. Doing so causes thermal transfer between the cold suction line and the warmer liquid line, which severely degrades system efficiency and causes the lines to sweat. Instead, we wrap each copper line individually in high-quality, closed-cell elastomeric thermal insulation. Every seam and joint in the insulation must be glued or sealed with UV-resistant vapor barrier tape to prevent warm, humid air from contacting the cold copper.
Physical protection inside the wall is just as crucial. Where the lines pass through top or bottom wood plates, they are vulnerable to stray drywall screws or finish nails. To prevent a disaster where a nail punctures a copper line (which can take years to rust away and leak), we install heavy-duty steel nail plates over the studs and plates where the lines pass through.
Finally, we seal both ends of the wall penetration. We use weatherproof, non-hardening sealing putty and exterior-grade silicone caulk to seal the gaps around the wall sleeve. This keeps warm air, moisture, and pests from entering your home’s wall cavity.
For homeowners in West Linn, our protective sealing and insulation practices are a standard part of our HVAC Installation West Linn OR services.
Frequently Asked Questions About Line Set Routing
What is the difference between pre-charged and standard line sets?
Pre-charged line sets come from the manufacturer sealed and pre-filled with a precise amount of refrigerant. They are designed for quick connection without the need for specialized HVAC tools. Standard line sets, on the other hand, are open copper tubes that must be cut, flared, connected, pressure-tested with nitrogen, and evacuated with a vacuum pump to below 500 microns before any refrigerant is introduced.
While pre-charged lines can simplify some installations, standard line sets are far superior for in-wall routing because they allow us to cut the copper to the exact length needed, eliminating bulky excess coils and reducing the risk of kinks inside your walls.
Can you run mini-split line sets through interior walls or multiple floors?
Yes, we route line sets through interior walls, attics, and crawl spaces regularly. When routing through multiple floors, we must carefully calculate the system's vertical elevation limits (typically 33 to 50 feet maximum) and total equivalent length (typically 15 to 50 feet standard, up to 100 feet with oil traps and an extra refrigerant charge).
For long vertical runs, we must install oil traps to ensure that the compressor oil can climb back up to the outdoor unit. That a 1% to 2% efficiency loss occurs for every 25 feet of line set length beyond the manufacturer's optimal range, so we always map out the shortest, straightest path possible.
How often do mini-split condensate drain lines clog?
On average, mini-split condensate drain lines require cleaning every 2 to 4 years. Because the indoor unit acts as a giant air filter, dust, pet dander, and organic matter mix with the moisture on the evaporator coil and wash down into the drain line. This creates a prime breeding ground for algae and mold, which eventually forms a gelatinous clog.
Regularly flushing the drain line from an accessible cleanout point with distilled white vinegar or warm water is the best way to prevent clogs and avoid water damage to your walls.
Conclusion
Understanding how line sets are run through your walls takes the mystery out of ductless mini-split installations. Whether you choose the flawless look of in-wall concealment or the practical accessibility of an exterior line hide, the key to a reliable, long-lasting system lies in the details: proper wall penetration slopes, careful bend radii, precise flare torquing, and robust insulation.
At Best Owner Direct HVAC & Electrical, we bring decades of experience to every installation across Cornelius, Beaverton, Hillsboro, and the surrounding Portland communities. We take pride in treating your home's structure and finishes with the highest level of care, ensuring your system runs beautifully and efficiently for years to come.
If you are ready to upgrade your home's comfort with a professionally installed ductless system, explore our Mini Split Installation Services and schedule a consultation with our local, family-owned team today.



Navigating Fall HVAC Tune-Ups in Cornelius Before the Rain StartsThe Pacific Northwest's sudden shift to autumn rain creates a narrow window for outdoor maintenance. Booking your heating tune-up in September prevents dangerous delays once the storms hit.
Read more

How Pacific Northwest Heat Domes Made Heat Pumps a NecessityDiscover how Pacific Northwest heat domes changed the need for heat pumps for year-round resilience, cooling, and safety across Cascadia.
Read more

Understanding How Heat Pumps Defrost During Early Oregon FrostsWaking up to steam billowing from your outdoor unit is alarming, but it rarely means fire. Discover how this normal defrost cycle protects your equipment during the first fall freeze.
Read more